HOMEKEEPER USER GUIDE
Your home records, made simple.
Start with an appliance or home item, add its maintenance tasks, and turn on backup to keep a recovery copy if you lose or replace your iPhone. No HomeKeeper account or login is needed.
What the bottom menu does
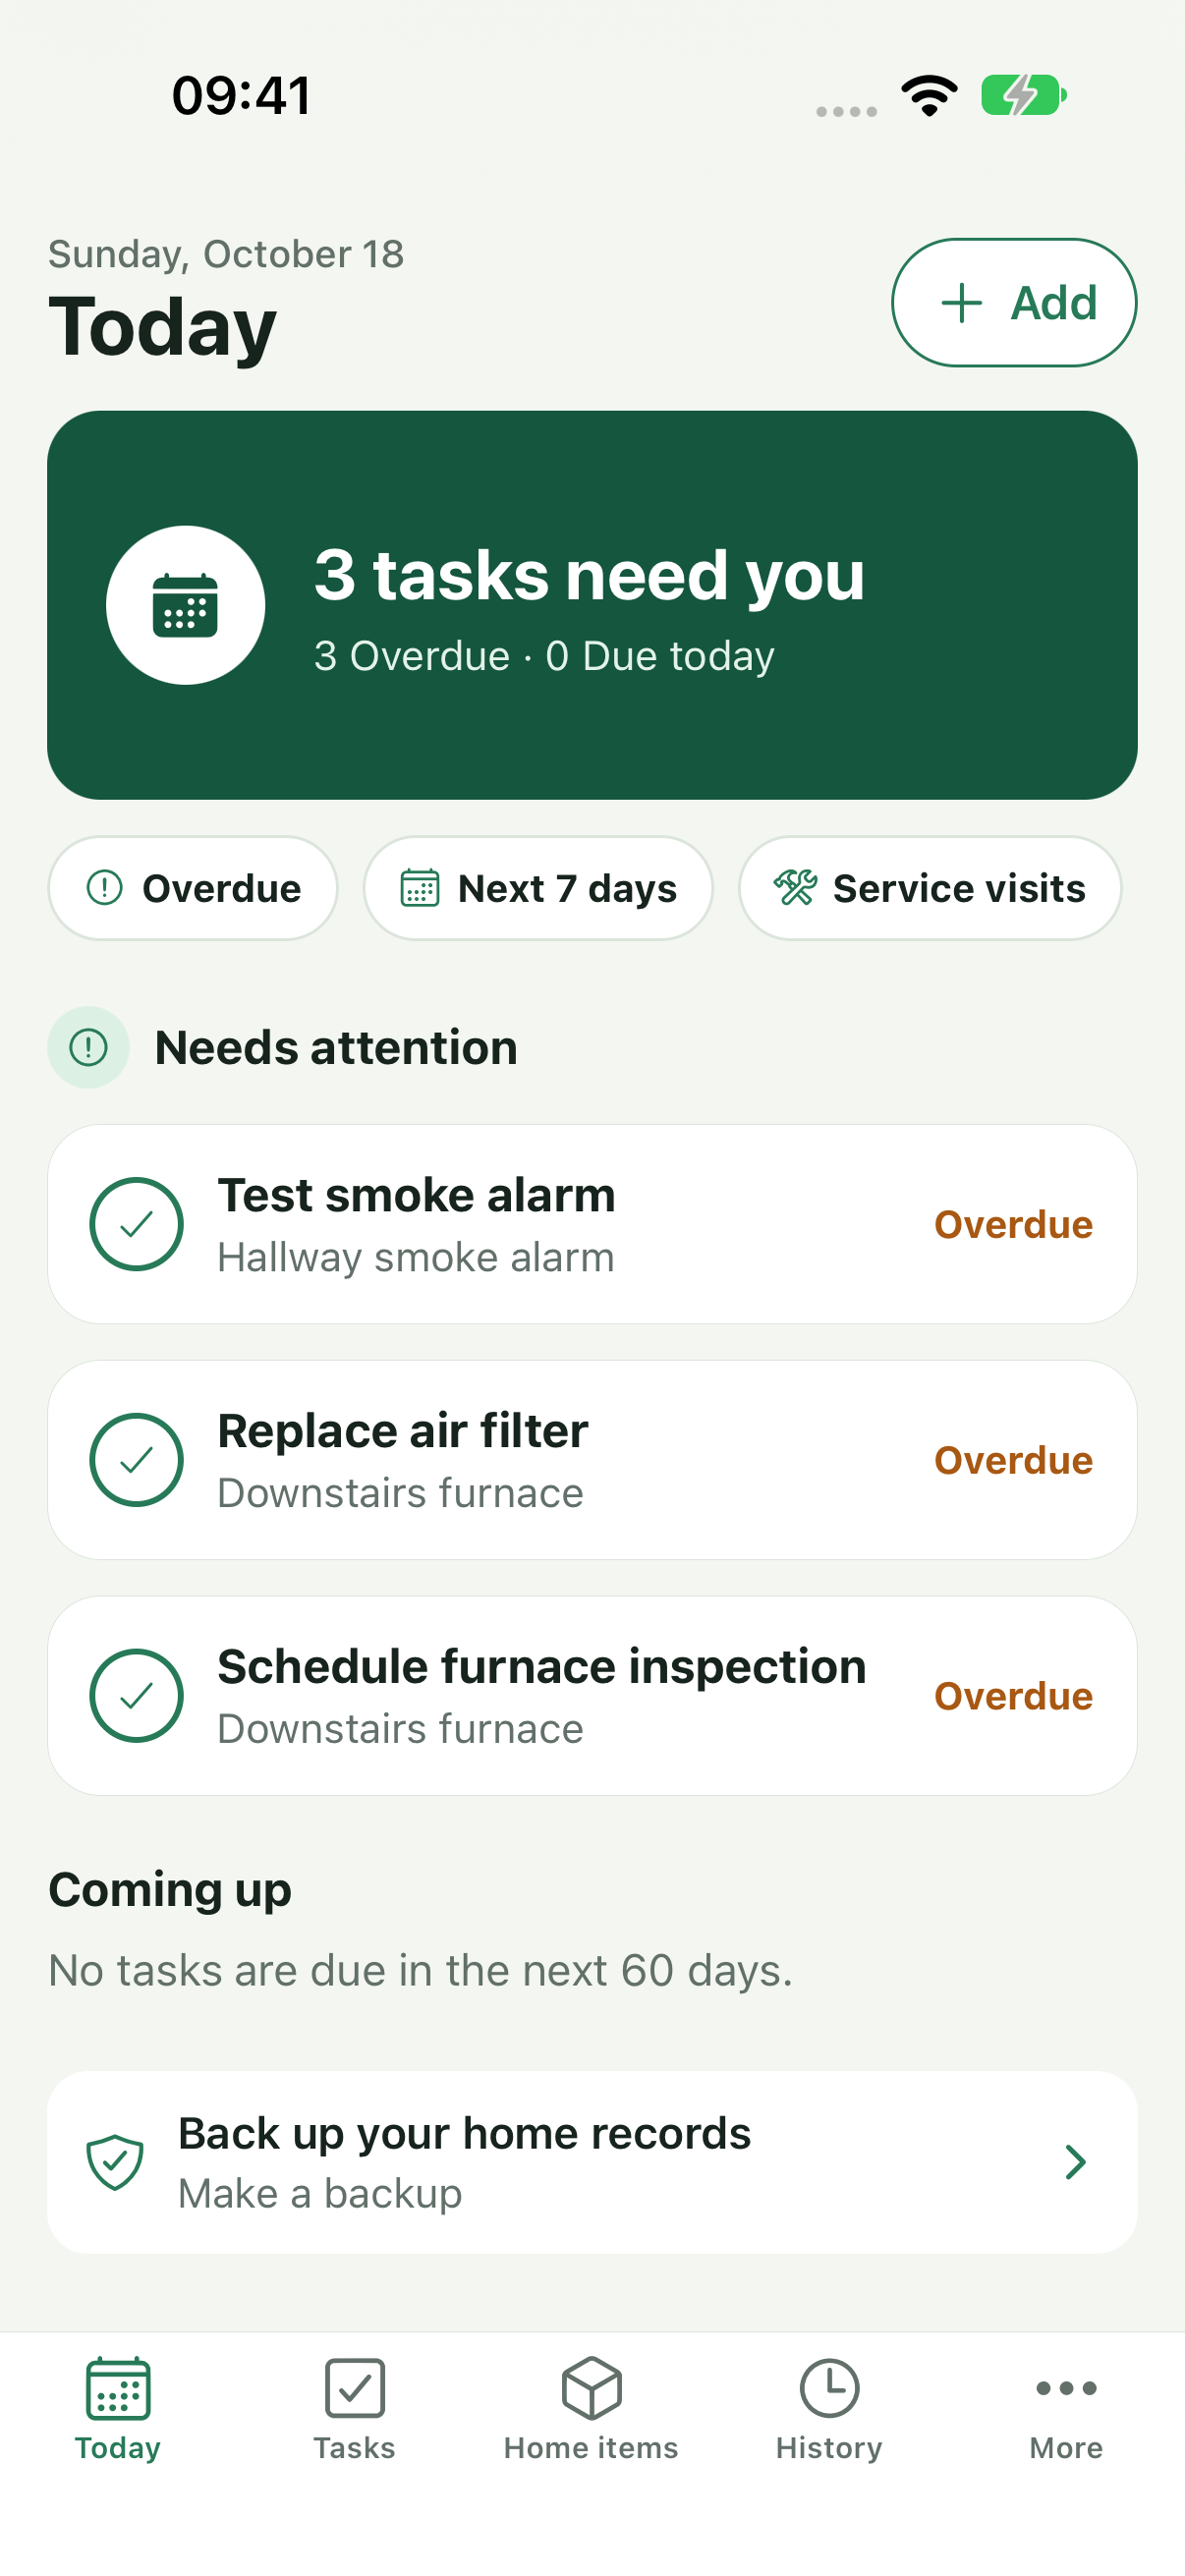
- Today — What needs your attention
- See overdue tasks, tasks due today, and upcoming deadlines. Start here when you want to know what to do next. Filters help narrow the list.
- Tasks — Your maintenance plan
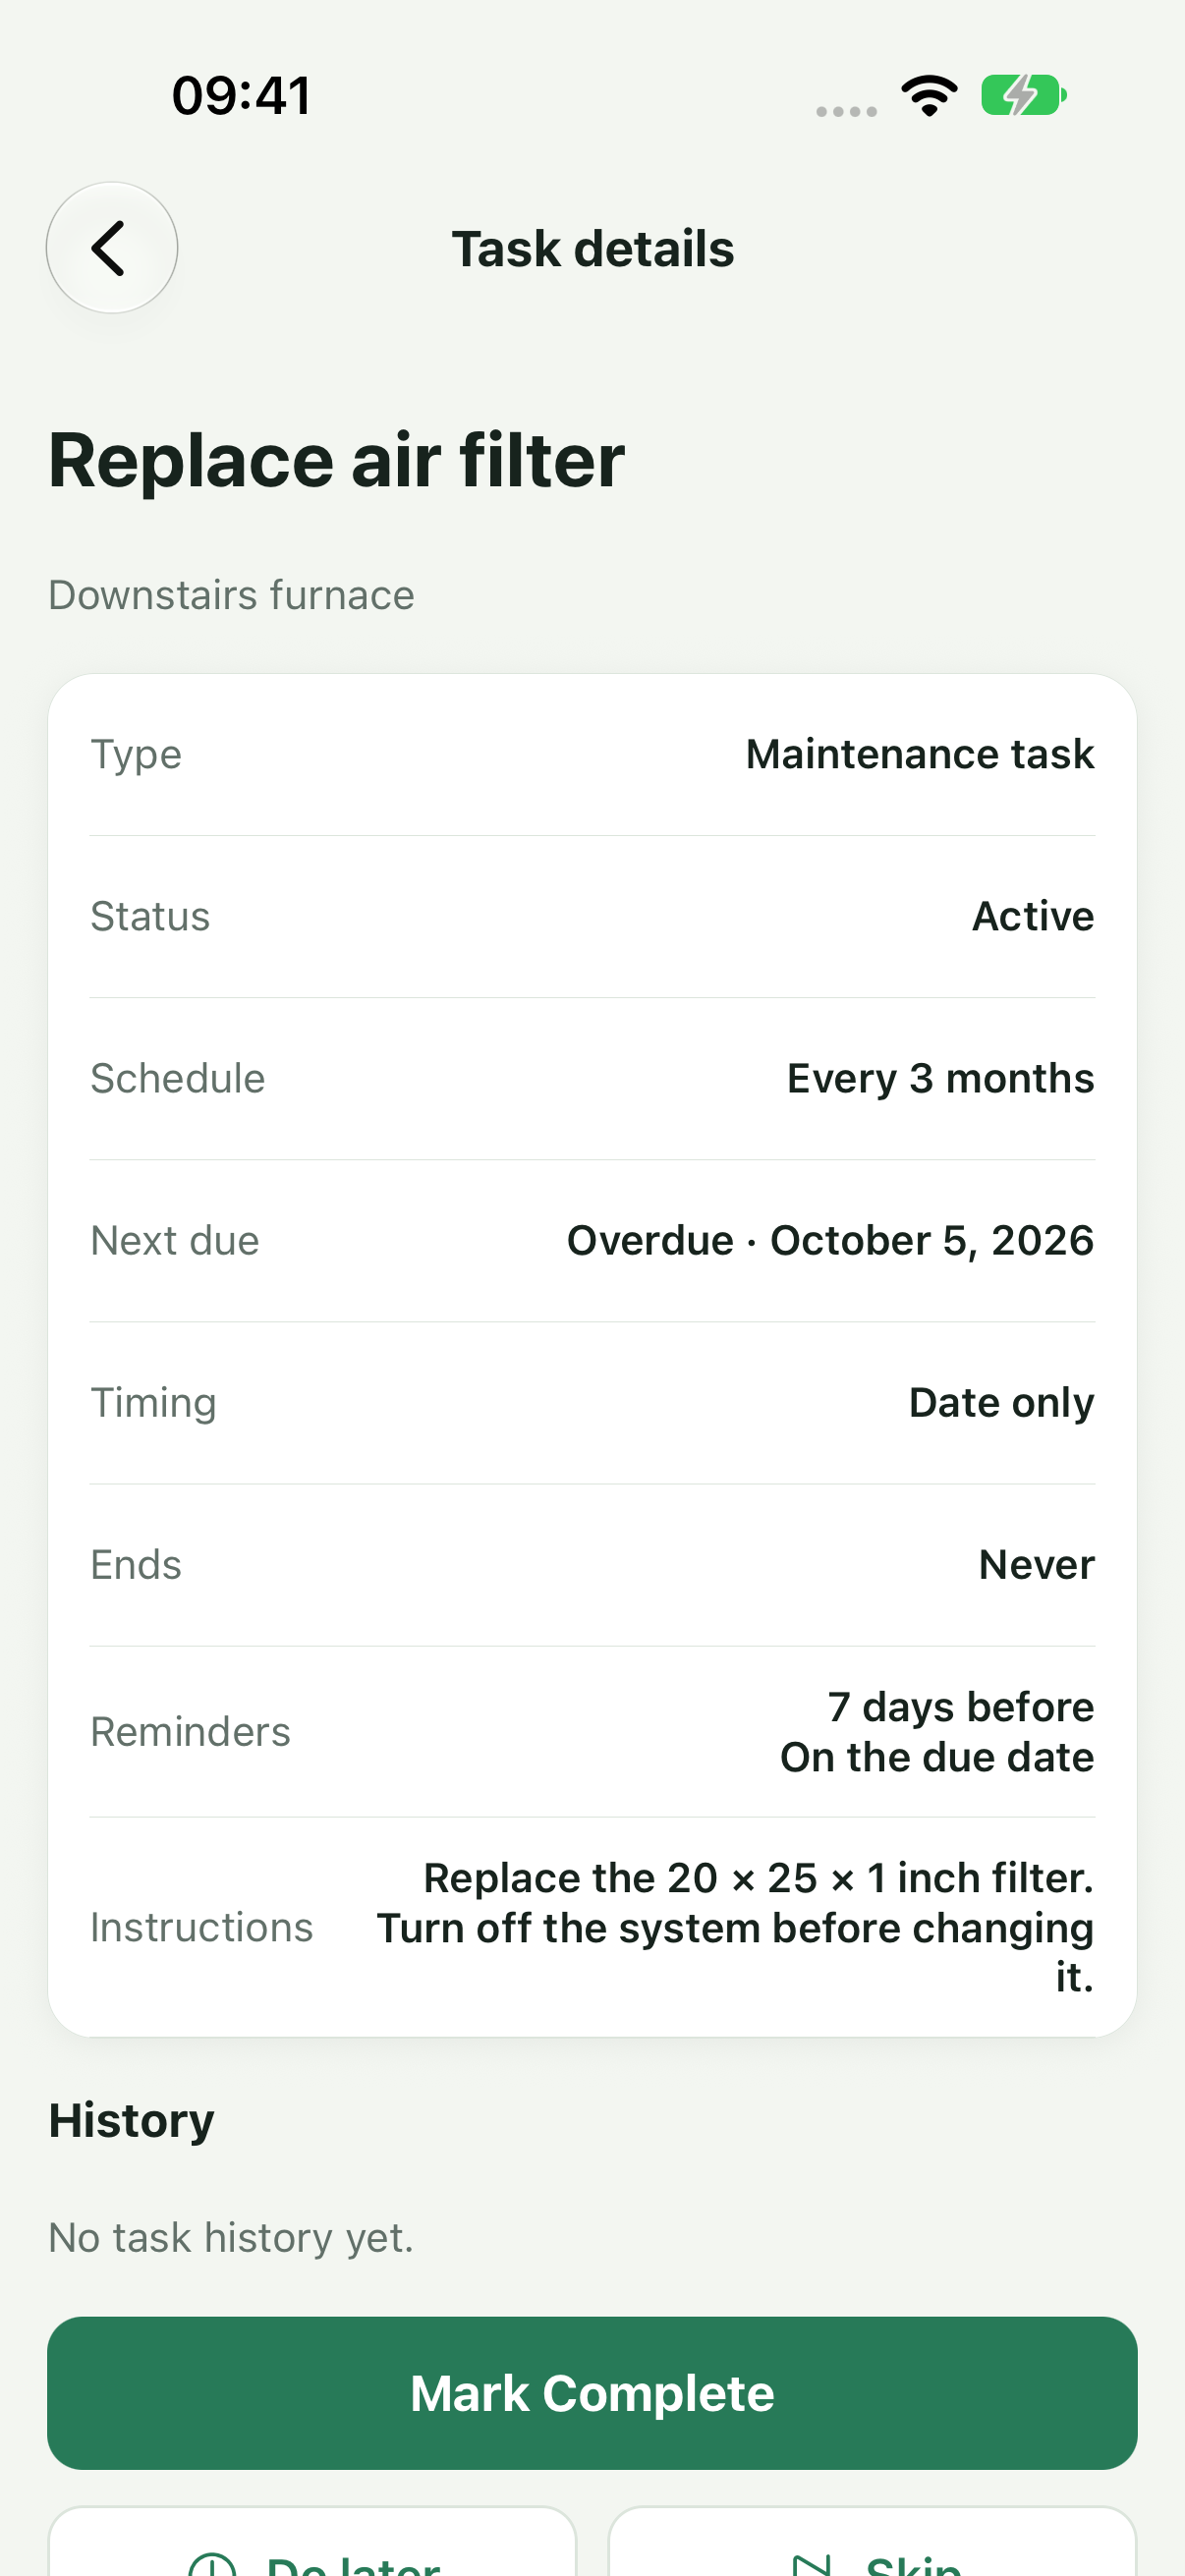
- Create and manage maintenance tasks. Set a date or repeating schedule, add instructions, and choose reminders. Complete work, do it later, skip an occurrence, or pause a task when needed.
- Home items — What you care for
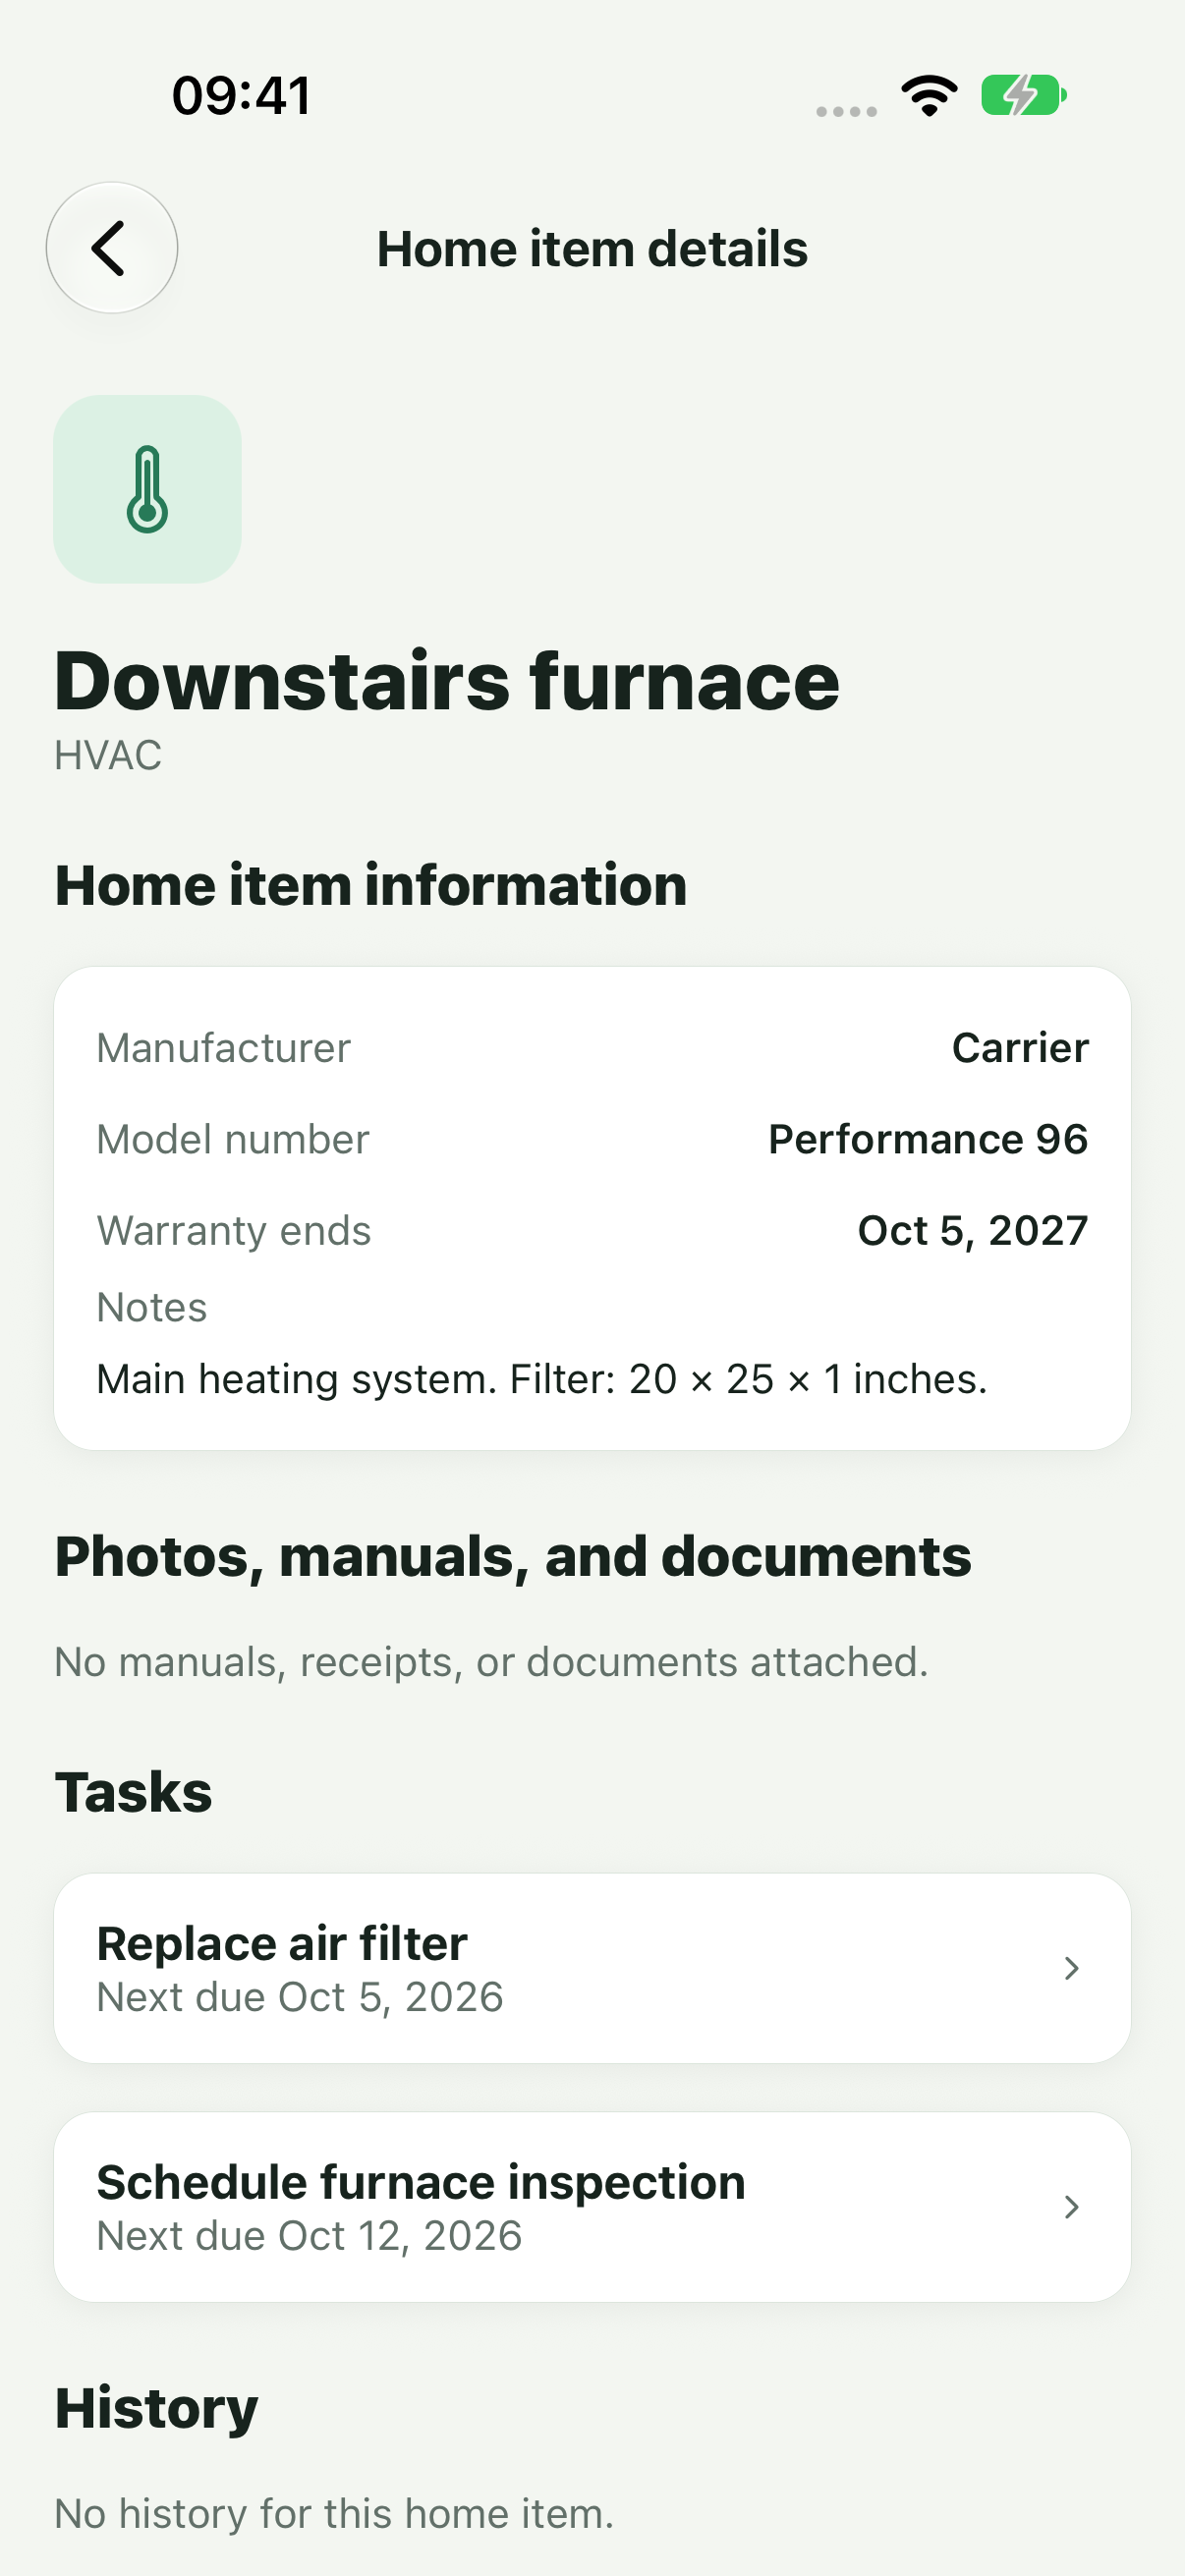
- Keep appliances and other home items, such as an air conditioner or water heater. Save model and serial numbers, warranty dates, photos, manuals, and related tasks. Label scanning can help enter details; review its suggestions before saving.
- History — What has already happened
- Review completed maintenance and service records. Task history is protected to preserve a trustworthy record; use the available correction option if an action was a mistake.
- More — Settings, backup, and help
- Find backup and restore, reminder settings, appearance and language options, privacy, support, and purchase information. Check your backup status here.
These examples use fictional home records. Tap a screenshot to see it larger; use your browser's Back button to return.
Home items and label scanning
Tap a topic to open its instructions. Optional information can be added later; you do not need to fill every field.
Add or edit a home item
- Open Home items and tap +.
- Enter a name you recognize, such as Kitchen refrigerator, and choose a category. Add a location if useful.
- Expand Details for manufacturer, model, serial number, warranty date and notes.
- Add a main photo or extra photos, manuals and receipts in the photo/document section. Tap Save home item.
- To change it later, open the item, choose More actions → Edit home item, make your changes and save. Tap saved photos to view a larger version.
Scan an appliance label
- While adding or editing an item, expand Details and open label scanning.
- Photograph the printed model/serial label—not just the appliance—or choose an existing photo. Move back slightly if close-up text will not focus; tilt the phone to reduce glare.
- Review the suggestions. Existing typed details are preserved; correct uncertain characters such as 0/O or 1/I. Select scanned text to use for a field when recognition misses it, or retake the photo.
- Review the options to keep the label photo and scanned text; both are selected by default. The label photo is a reference photo, not a replacement for your main photo. Recognized text is kept separately from Notes.
- Enter any missing item name and save the home item. Scanning is free and runs on the device; recognition can make mistakes.
Retire or restore an item you no longer own
Open the item and choose More actions → Retire home item, then confirm. Its history stays available and active tasks are paused. Use the Home items filter to find retired items and open one to restore it. Restoring the item does not resume its old tasks: open each paused task and choose Resume when you want reminders again.
Tasks and reminders
Create a task and choose when it ends
- Use Tasks → +, Today → Add, or open a home item and tap Add task.
- Enter a task name. Select the home item, or Whole home for work not tied to one item.
- Choose a one-time or repeating schedule and its due date. Choose Date only or Specific time as needed.
- For repeating work, choose an ending date or completion limit if wanted. Expand optional details for reminder choices and instructions.
- Tap Save. Open the task to review its status, schedule, date, reminders and any completion limit/progress. Scroll down for its actions.
Complete, skip, postpone, pause or correct a task
- Mark Complete: record finished work and an optional comment. Repeating tasks advance until their ending rule is reached.
- Skip: skip this occurrence. A skip is recorded in history but does not use a completion allowance.
- Do later: choose a later date. A paused task must be resumed first.
- Pause / Resume: stop or restart that task's reminders without deleting its history.
- Undo: available briefly after completing or skipping. Later, use Correct latest action when offered. Original history is preserved and a correction is added.
Edit Task changes future settings; it does not erase recorded completions. Tasks with history cannot simply be deleted.
Turn on reminders or troubleshoot a missing alert
- Open More → Reminders, turn on reminders and allow notifications when asked.
- Choose the app-level advance notice and any warranty reminders you want. Save the settings.
- Individual tasks can have their own reminder choices; an empty task-specific selection uses the app settings. Date-only tasks use 9:00 AM; timed tasks use their scheduled time.
- Use Send test notification, then leave the app. If it does not arrive, check notification permissions and Focus settings on the iPhone.
Paused/completed tasks do not send future task reminders. A notification is not proof that a backup succeeded.
Repairs, costs and service visits
Record a repair or service that already happened
- Open a home item and choose More actions → Add service record, or use the Add menu on Today.
- Choose the item, enter a service title and date, and describe the work. Add findings or notes if helpful.
- Enter the cost/currency when relevant. Choose DIY for your own work, or enter the provider.
- Use the photo/document button to add camera photos, existing photos, receipts, invoices or other documents. Save.
- Find the saved record in History or the item's history. Manually entered service records can be edited or deleted; task-generated completion history uses corrections instead.
Schedule a future service visit
Use Today → Add → Schedule service visit, or the item's More actions menu. Enter a visit name, provider, date and arrival window, then choose reminders and save. Visits appear in Today and Tasks. Complete the visit when it happens; add a service record for detailed work, receipts and cost. A visit is a reminder in HomeKeeper—it does not book or contact the provider for you.
Free and Pro
What is included, and how do I buy or restore Pro?
Free lets you create up to 3 active home items and 10 active tasks; service visits count as tasks. Label scanning, reminders, backup/restore and export remain available without Pro. More shows your active usage, and the app checks the limit before opening another creation form.
Pro is a one-time unlock of unlimited home items and tasks, with no subscription. Open HomeKeeper Pro in More, review Apple's current localized price and confirm through Apple. Pro does not add iCloud storage or promise future cloud services. Existing/imported records stay accessible without buying Pro.
If you already bought Pro, use the same Apple Account for App Store purchases and choose Restore Purchases on the Pro screen if needed. When ownership is recognized, the app shows Pro unlocked. Contact support if it is still missing—do not buy again just to troubleshoot.
Other settings and useful tools
Language, appearance, warranty, storage and export
In More, change English/Spanish and appearance, save your home-warranty company/contact information, or open Help and Privacy. Warranty website links open in the device browser.
Storage can optimize app-owned photos to reduce space; it does not change your original photo library or recompress documents. Keep a backup before major cleanup.
Export CSV summary creates a readable spreadsheet, not a recovery backup. It excludes photos/documents. Delete all data removes local records and managed attachments after confirmation; it does not remove your separate backup files.
Why automatic backup matters
Your records normally live on your iPhone. If the phone is lost, damaged, or the app is deleted, a separate backup can help you get those records back. A backup includes home items, tasks, history, settings, photos, and documents stored by HomeKeeper.
Turn it on once
- Make sure your iPhone is signed in to your Apple Account and iCloud Drive is enabled.
- Open More, then the backup screen. Tap Turn on automatic backup.
- Choose whether to protect backups with a password. Save that password somewhere safe outside HomeKeeper.
- Wait for the first backup to finish and check Last backup for a successful copy or an error.
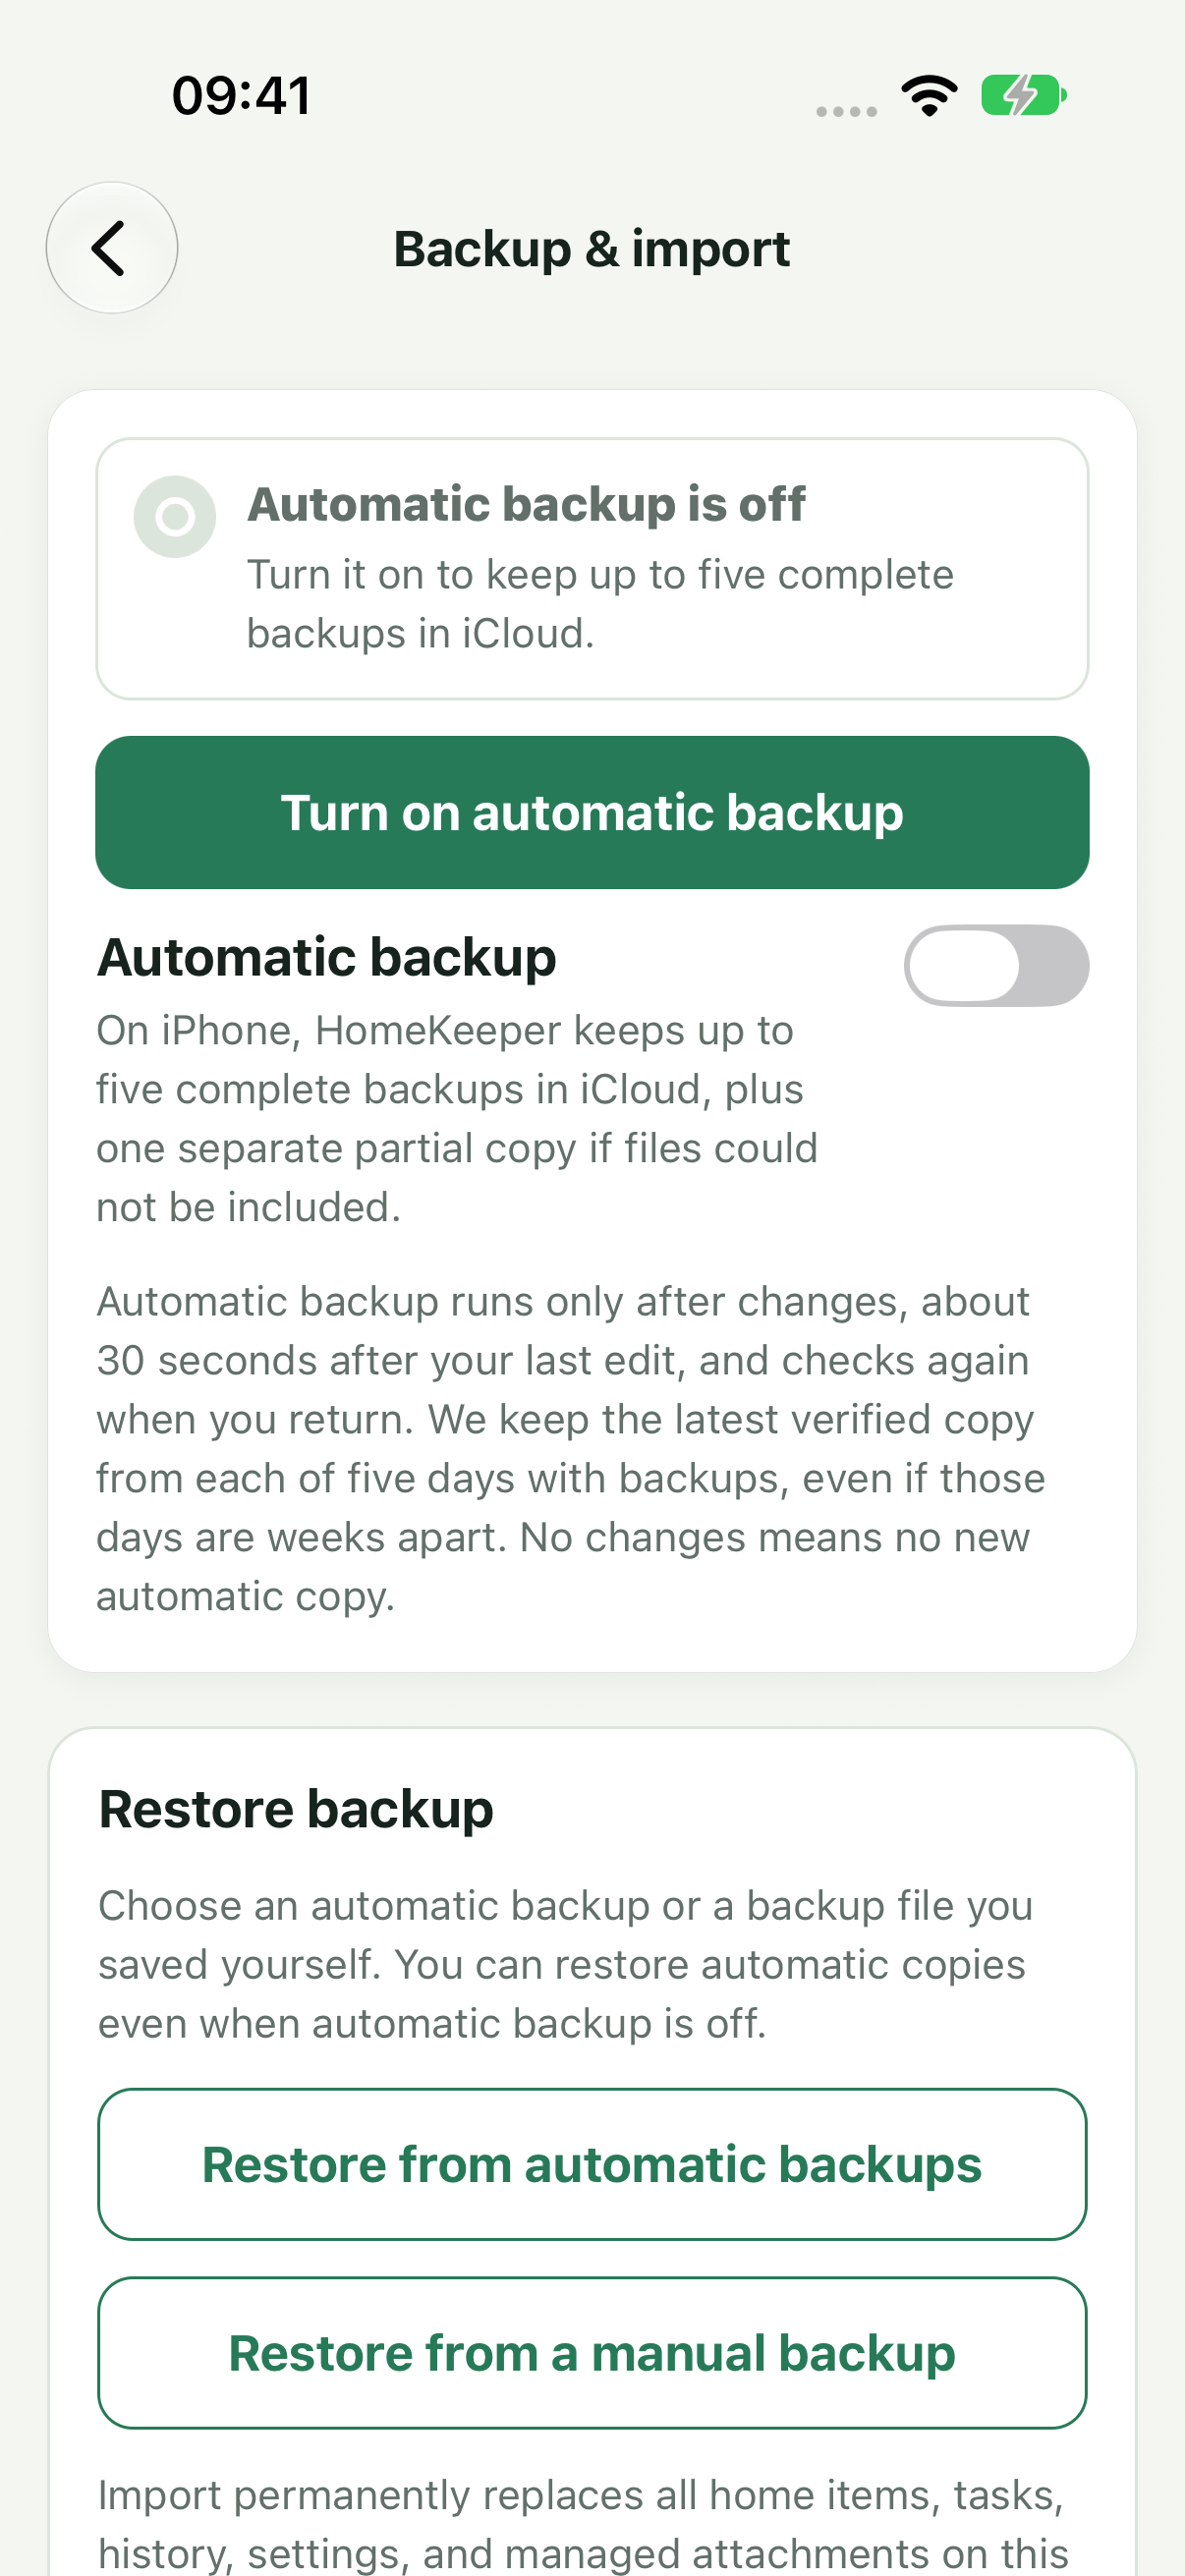
HomeKeeper saves automatic copies directly to your own iCloud Drive. They do not wait for your whole iPhone to back up. TMIGA never receives your home records, backup contents, or backup password.
When does it happen?
With automatic backup on, HomeKeeper checks when you open or return to the app. After saving changes, it attempts a copy after about 30 seconds without another edit, and checks again when you return to the app. Without changes, no new automatic copy is created. The latest complete iCloud-confirmed copy from each of five days with backups is kept, even across gaps in use. Copies awaiting upload confirmation may remain temporarily; a partial copy has a separate slot and never replaces a complete copy.
Leave the app open while a backup finishes. iOS may let a copy finish after you leave, but keeping the app open gives it the best chance to finish. Internet access, iCloud storage, and device settings can delay a backup. A reminder notification alone does not mean a backup succeeded.
Check that you are protected
Check the backup status for Backed up to iCloud or a message such as Uploading to iCloud, Waiting for internet or Needs attention. A copy checked on this iPhone is not proof that iCloud finished uploading it. If iCloud is full or unavailable, follow the message, free space or check your connection, and try again. Pro does not add iCloud space; extra iCloud storage is an Apple product purchased separately.
A password-protected backup is encrypted. Without a password, HomeKeeper does not encrypt the backup file. If you lose a backup password, TMIGA cannot recover it or unlock that backup.
Moving to a new iPhone
Install HomeKeeper, sign in to the same Apple Account on the iPhone, and enable iCloud Drive. On a new installation, HomeKeeper can look for existing automatic backups and offer to restore one. You can also open the backup screen and choose Restore from automatic backups.
In the backup screen shown above, choose Restore from automatic backups for app-created iCloud copies, or Restore from a manual backup for a file you saved or received.
Choose a backup, review its preview, and enter its password if it has one. Restoring can take time, especially when iCloud must download photos and documents; keep the app open and follow the progress messages.
Restore replaces the HomeKeeper data currently on that phone. It does not combine two sets of records. Save a backup of any current records you want to keep before restoring.
Automatic backup is recovery, not live sync. Another phone will not instantly show your changes. Recovery requires an existing accessible backup and its password, if protected.
Manual backups and sharing
Open Manual backup — save or share and tap Save or share backup. The system menu lets you use Save to Files or send a copy through another app. HomeKeeper does not ask you to confirm afterward and cannot confirm that you kept or delivered the file; check Files or the receiving app yourself. Google Drive or Dropbox may appear through their Files integration; there is no direct Google Drive login in HomeKeeper on iPhone.
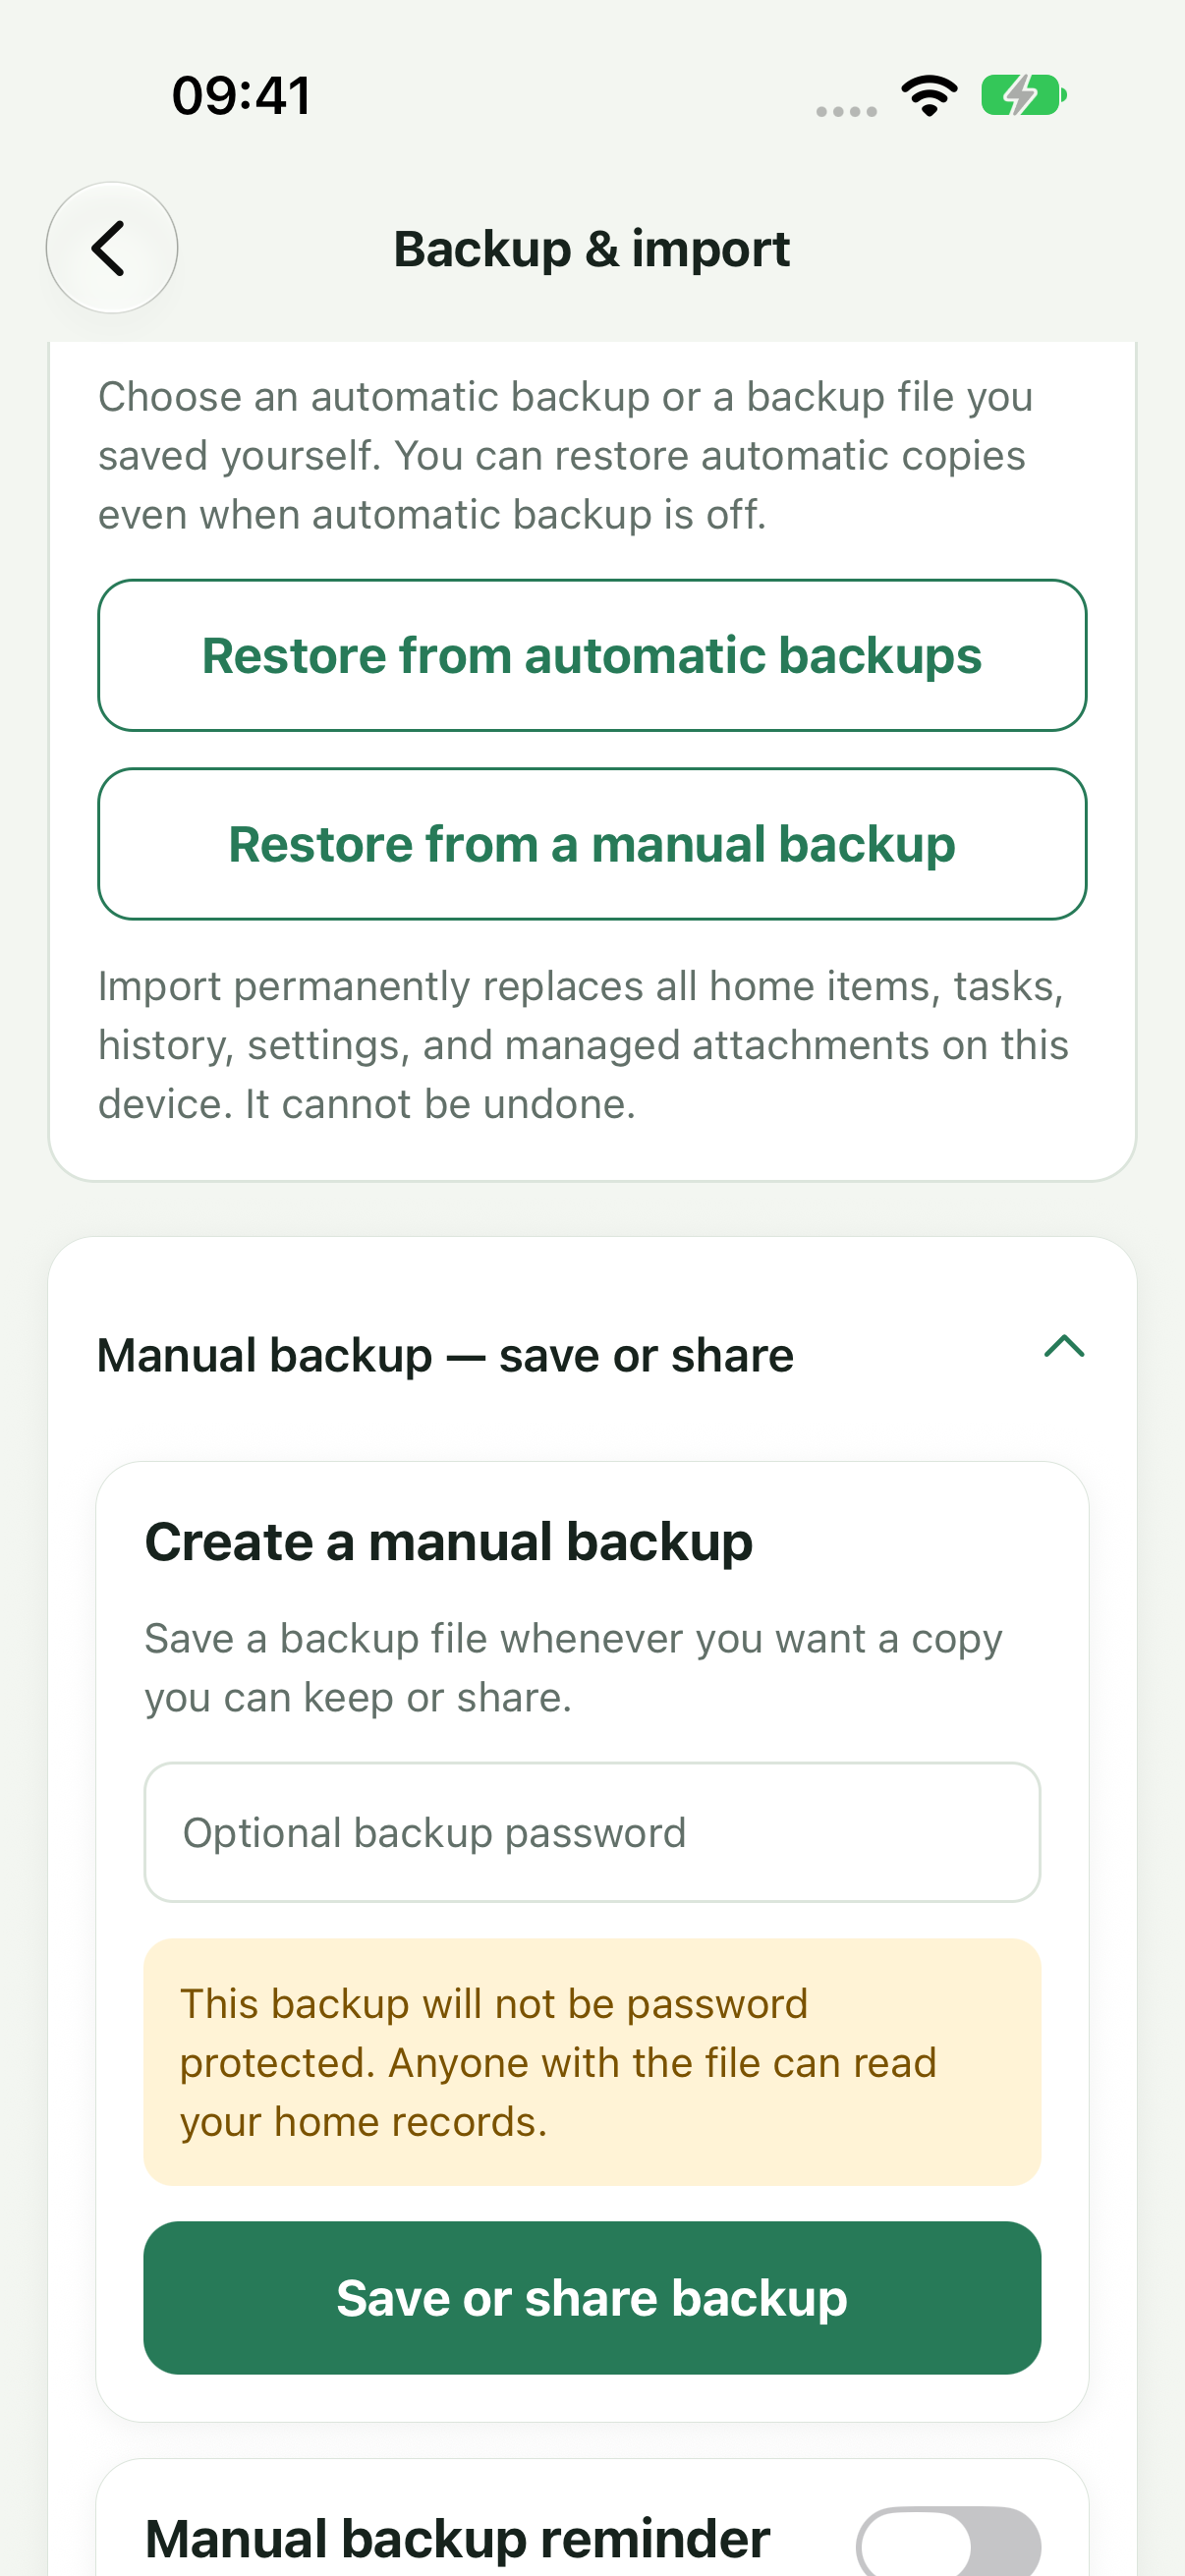
You can share the backup with another person, who can import it using Restore from a manual backup. Only share with someone you trust: the file contains your home records and attachments. If protected, they also need its password.
Sharing a backup does not create a shared live home. Importing replaces the recipient's current HomeKeeper data. CSV export is a readable summary, not a full recovery backup; it does not include photos or documents.
Need help?
Email support@tmiga.com. Do not send us your backup password. Read our Privacy Policy for more about storage and privacy.